
Almost every IT professional today uses virtual machines (VMs) in some shape or form. VMs provide an easy way of taking snapshots, performing tests, and deleting and reverting back to prior states. With a virtual environment, you can also build small but realistic labs and replicate enterprise networks and applications that are often found in corporate environments.
Refer to the Build Your Lab main section for guides on building different kinds of labs.
Select and install a virtualization software
Install your virtualization software (also called a hypervisor) of your choice. Depending on your operating system, there are several freely-available options that can be used to run on a desktop or bare-metal system:

Since VirtualBox is free and available for Windows, Mac, and Linux, most of our tutorials will be using it as the virtualization software of choice. It is easy to set up and can be downloaded here: https://www.virtualbox.org/wiki/Downloads
Creating virtual machines
Depending on the type of lab, there will be various kinds of virtual machines involved. There are essentially two ways to set up VMs – either by importing an OVA or by creating a new virtual machine and installing it from an ISO:
- Importing a virtual machine: VirtualBox allows the importing of Open Virtual Appliance (OVA) files or Open Virtualization Format (OVF) packages. An OVA is a single file that essentially consists of OVF files as a .tar package. These are usually pre-configured VMs exported from other sources and typically do not require any additional installation steps.
- Creating a virtual machine: It is very likely that the system to be installed was downloaded in an ISO format, which is essentially an image of an optical disk. In order to create a new virtual machine from scratch, the VirtualBox manager must be used. After finishing the setup manager, the downloaded ISO image needs to be selected in the VM’s Settings -> Storage menu as an Optical Disk File. This allows you to install the ISO image on the virtual hard disk when starting the virtual machine.
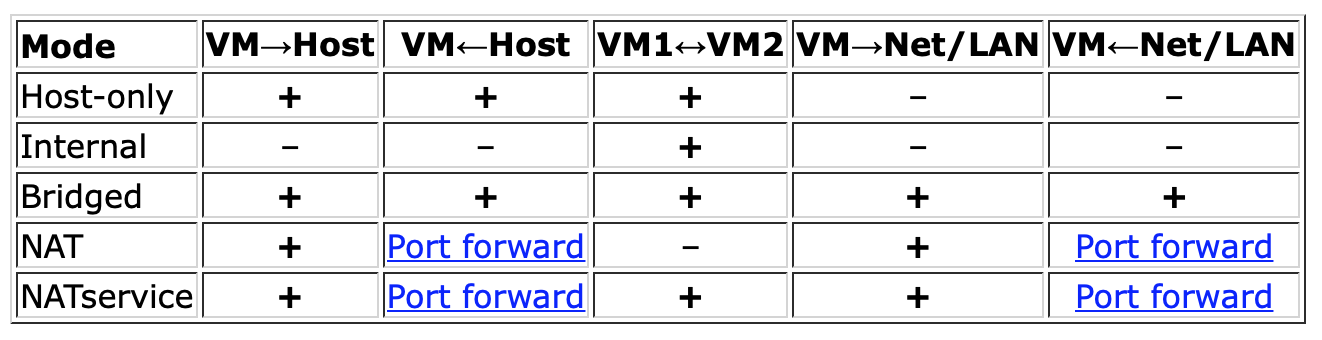
Choosing the right networking mode
One step that is often confusing, especially for beginners, is to choose the right networking mode for VMs. Our tutorials will mention the recommended networking mode for the respective lab setup. However, it is highly recommended that you read the quick introduction on networking modes from the VirtualBox manual page: https://www.virtualbox.org/manual/ch06.html#networkingmodes
To set the VM’s network adapter mode:
- Right-click on the VM and choose “Settings”
- Click on the “Network” tab and assign the respective network to the network adapter
Installing VirtualBox Extension Pack
It is also recommended to download the extension pack, which extends the functionality of the Oracle VM VirtualBox base package. Additional features include support for USB 2.0 and USB 3.0 devices, VirtualBox RDP, disk encryption, NVMe and PXE boot for Intel cards.
- Find the section “VirtualBox xxx Oracle VM VirtualBox Extension Pack” in https://www.virtualbox.org/wiki/Downloads
- Run and install the package
- You can view and edit extentions in the VirtualBox manager under File -> Preferences -> Extensions
Installing VirtualBox Guest Additions
After creating a new VM, it is recommended to install VirtualBox Guest Additions for increased user experience. Depending on the VM’s operating system, this can enable several features such as using shared folders, clipboard, and drag and drop between guest and host system as well as improved video support. When installing Guest Additions, your VM needs to have an optical drive available. If that is not the case, you can add one when the VM is powered off in the VirtualBox Settings -> Storage.
- To install Guest Additions, turn on the VM and select the VirtualBox menu Devices -> Insert Virtual Box Guest Additions CD image…
- Open the workstation’s CD drive and execute the Guest Additions executable. The name of the file depends on the system type.
- Once the installer is completed, a restart is required.
Pro-tip: Once Guest Additions are installed, enabling the scaled mode feature (View -> Scaled Mode) automatically adapts the guest system’s screen resolution to fit your display. Additional information on VirtualBox Guest Additions can be found here: https://www.virtualbox.org/manual/ch04.html
Finally – and importantly: Do not forget to take frequent snapshots of your VMs! It is important to be able to restore systems and go back to know-good states. Make sure to take initial snapshots even before first booting VMs. This is also a good way to reset a Windows VM quickly after the OS trial expires (as recommended by Microsoft).