
Build Your Lab: Basic Lab
A basic lab that gets anyone’s DFIR journey going. All you need is VirtualBox and a free Windows 10 VM.
A lot of cyber attacks occur in Windows-based environments. Therefore, it is important to have a lab environment available to train and improve you DFIR skills.
A single Windows system is often times enough, to start an investigation and practice critical DFIR skills, such as data acquisition in virtual machines, examining data and analyzing the information.
Skills to practice:
- Virtualization
- Data acquisition
- Disk forensic
- Memory forensic
- Malware analysis
Systems:
- 1 x Windows 10 VM
Requirements:
- 2-4 GB of memory
Overview:
This guide provides steps for installing VirtualBox and a Windows 10 virtual machine (VM). If you do not bring your own Windows licenses, the good news is, Windows trial versions are available.
Time: ~ 30 mins
Setup Instructions:
Download and install the virtualization software
- Select your virtualization software of choice based on the Virtualization Primer. We recommend VirtualBox for our tutorials.
Download and install a Windows 10 VM
You can get ISOs for a 90-day Windows 10/11 trial version from the Microsoft evaluation center where you have to register.
Alternatively, there is a post on the Microsoft Tech Community that provides direct links for downloading Windows ISOs:
- Download an x64 Windows 10 Enterprise ISO (90 day evaluation): Download Windows ISOs
- In VirtualBox create a new Machine:
- Version: Windows 10 (64-bit)
- Memory: At least 2 GB, ideally 4 GB (4096 MB)
- Hard disk: Create a virtual hard disk (VDI)
- File size: 40 GB
- Storage: Dynamically allocated (this saves disk space)
- Click Create
- Before starting the VM, right-click on it and open Settings.
- System -> Processor: It’s recommended to set the number of processors to at least 2.
- Storage: Click on the “Empty” disk. On the right, click on the disk symbol next to the Optical Drive selection field. Click “Choose a disk file…” and attach the previously downloaded Windows 10 ISO to the VM’s optical drive.
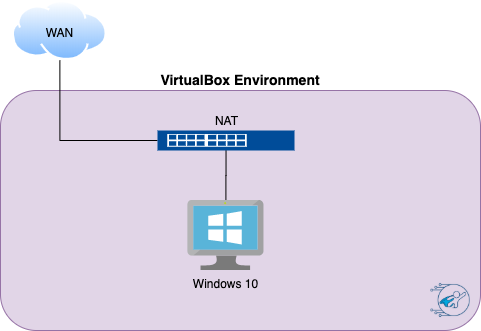
- Network: By default, the networking mode is set to “NAT”, which allows internet access through the guest system.
- Start the VM and click through the Windows 10 installation process.
- When prompted for it, there is no need to provide a product key.
- Also, choose Windows 10 Pro as the operating system and select “Custom” to get a plain, new system.
- Furthermore, create an “offline” account (no online account setup needed) and define a username and password.
- You can also disable all privacy-related features as well as “Cortana” when prompted to limit performance requirements.
Finish the setup
-
- Recommended: Install VirtualBox Guest Additions as outlined in the Virtualization Primer. This will increase the user experience and allow for better interaction with the VM such as using shared folders, copy & paste features, display settings, etc. These features need to be enabled in the VM settings after the installation.
- Take a snapshot once the VM is set up and powered off. That way you can always revert back and start with a clean setup.